5 Tips for Reviving Worn-Out Wooden Furniture
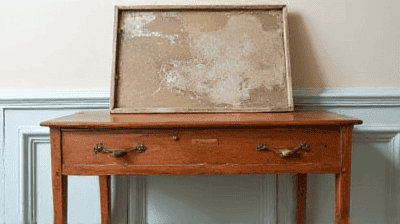
Wooden furniture is a timeless investment that can bring warmth and character to any home. However, over time, even the most beautiful pieces can become worn out, losing their luster and appeal. Whether it’s due to scratches, fading, or general wear and tear, many homeowners might feel disheartened when faced with tired-looking furniture. Instead of discarding these pieces, it’s possible to breathe new life into them with some dedicated care and attention.
Understanding the Common Issues with Wooden Furniture
Before diving into the tips, it’s important to understand the typical issues that wooden furniture may face as it ages. Recognizing these problems will help you choose the right approach for restoration.
1. Scratches and Dents
Daily use can lead to scratches and dents on wooden surfaces, which may accumulate over time. These imperfections can detract from the overall aesthetic appeal of your furniture.
2. Fading and Discoloration
Exposure to sunlight can cause wood finishes to fade, leading to uneven tones and discoloration. This is particularly noticeable on pieces placed near windows.
3. Water Spots and Stains
Moisture spills, whether from drinks or cleaning, can leave water spots or rings on wooden furniture. Over time, these stains can become more prominent and hard to remove.
4. Dullness and Loss of Shine
Regular wear can lead to a dull finish, making the furniture look lifeless. Dust and dirt can accumulate, further contributing to the lack of luster.
5. Structural Issues
In addition to aesthetic concerns, wooden furniture may suffer from structural issues such as loose joints, wobbly legs, or damaged parts. Addressing these problems is also essential in the revival process.
Tip 1: Cleaning and Preparing the Surface
The first step in reviving worn-out wooden furniture is to thoroughly clean the surface. Dirt, grease, and grime can accumulate, obscuring the wood's natural beauty and making repair efforts more difficult.
Cleaning Supplies Needed
Microfiber Cloths: Soft and lint-free, these cloths are ideal for dusting and cleaning without scratching the surface.
Mild Soap Solution: A mixture of warm water and a few drops of mild dish soap can be effective for cleaning.
Wood Cleaner: Specialized wood cleaning products are available that can help restore shine and protect the finish.
Soft Brush: A soft-bristle brush can help reach into crevices and remove dust from intricate carvings.
Wood Polish: After cleaning, a good quality wood polish can enhance the shine and protect the surface.
Cleaning Process
Dusting: Begin by dusting the entire piece of furniture with a microfiber cloth. Pay special attention to corners, carvings, and other detailed areas.
Washing: Dampen another cloth in the mild soap solution and gently wipe down the surface. Avoid soaking the wood; excess moisture can be harmful.
Drying: Immediately dry the furniture with a clean, dry cloth to remove any moisture left on the surface.
Inspecting: After cleaning, take a moment to inspect the piece for any deeper issues, such as scratches, stains, or structural problems that might need attention.
Tip 2: Repairing Scratches and Dents
Once the surface is clean, the next step is to address any scratches or dents. There are several methods for repairing these imperfections, depending on their severity.
Common Repair Techniques
Wood Filling: For deeper scratches or dents, use a wood filler. Choose a filler that closely matches the color of the wood. Apply it with a putty knife, smooth it out, and let it dry according to the manufacturer's instructions.
Walnut Method: For minor scratches, a walnut can work wonders. Rub the cut side of a walnut over the scratch; the natural oils in the nut help fill the scratch and restore color.
Hide Scratches with Crayons: Use color-matched furniture touch-up crayons to fill in scratches. This option is great for touch-ups and can blend well with the surrounding wood.
Sand and Stain: For more significant surface problems, gently sand the affected area with fine-grit sandpaper until smooth. Wipe the dust away and reapply the appropriate stain to match the original finish.
Finish Restoration: After repairing visible damage, consider applying a fresh coat of furniture finish or polyacrylic to protect the surface from further wear.
Repair Process
Identify Damage: Examine the furniture closely to identify all scratches and dents that need addressing.
Choose Repair Method: Select the appropriate repair method for each type of damage.
Apply Repairs: Follow the chosen repair method to fix scratches and dents, ensuring to follow all instructions for drying times and procedures.
Inspect After Repair: Once repairs are made, inspect the furniture again. Touch up any areas that may need further attention.
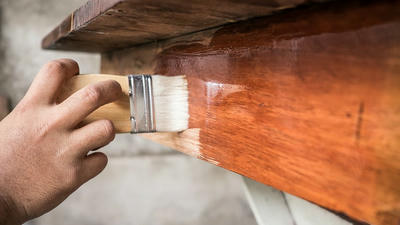
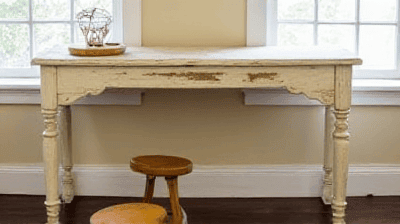
Tip 3: Refinished and Re-staining
If the furniture is severely faded or the finish is worn out, refinishing may be necessary. This process can bring back the original beauty of the wood and dramatically change its appearance.
Supplies Needed for Refinishing
Sandpaper: A range of sandpaper grits (coarse, medium, and fine) will help prepare the surface.
Paint Stripper: If needed, a chemical paint stripper can assist in removing old finishes.
Stain: Select a wood stain that matches the desired color of the wood.
Sealer: After staining, you’ll need a wood sealer or topcoat to protect the finish, such as polyurethane or varnish.
Brushes and Rags: Use quality brushes for even application of stain and finish, and rags for wiping off excess stain.
Refinishing Process
Removing Old Finish: If necessary, apply a paint stripper to the furniture to remove existing finishes. Follow the manufacturer's directions and ensure adequate ventilation.
Sanding the Surface: Sand the entire surface of the furniture, starting with coarse-grit sandpaper and gradually moving to fine-grit. Sand in the direction of the grain to avoid scratches.
Cleaning the Dust: Wipe down the furniture with a damp cloth to remove all sanding dust.
Applying Stain: Apply the wood stain using a brush or rag, working in small sections. Wipe off any excess stain with a clean rag, and allow it to dry completely.
Sealing the Finish: Once the stain is dry, apply a protective sealer to protect the wood from moisture and wear. Allow the sealer to cure fully according to manufacturer instructions.
Safety Considerations
- Always work in a well-ventilated area, especially when using chemical strippers or strong finishes.
- Use gloves and protective eyewear to guard against skin and eye irritation.
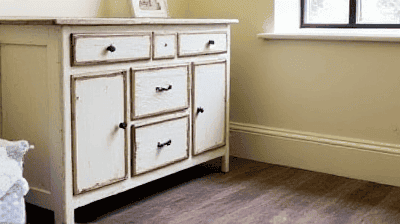
Tip 4: Enhancing and Protecting the Finish
To ensure your revived wooden furniture remains in optimal condition, enhancing and protecting the finish is essential. Regular maintenance can make a significant difference in preserving its beauty.
Recommended Protective Products
Furniture Wax: Wax provides a protective barrier against moisture and scratches while enhancing the wood’s natural sheen.
Furniture Polish: Use a quality furniture polish that contains natural oils to nourish the wood while improving shine.
Coasters and Placemats: Prevent rings and marks by using coasters for beverages and placemats for hot dishes.
UV Protection: For sun-exposed furniture, consider applying UV protectants or using window treatments to reduce sun damage.
Maintenance Process
Regular Dusting: Keep the furniture dust-free through regular dusting with a microfiber cloth, which can help maintain the finish.
Application of Polish: Apply furniture polish every few months to nourish the wood and enhance its appearance.
Using Wax: Consider applying wax to the surfaces annually. Follow the application instructions for a consistent finish.
Addressing Stains Quickly: Clean up spills immediately to prevent stains from setting in. Use a soft cloth or sponge dampened with water and mild soap for cleaning.
Long-Term Protection Strategies
- Keep furniture out of direct sunlight or use protective covers to shield it from UV rays.
- Regularly rotate decorative items to prevent uneven fading and wear patterns.
- Maintain a consistent humidity level in your home; overly dry environments can cause wood to crack or warp.
Tip 5: Repairing Structural Issues
In addition to cosmetic repairs, it's essential to address any structural concerns that may arise. Fixing loose joints or wobbly legs can enhance the furniture's functionality and longevity.
Common Structural Problems
Loose Joints: This often occurs in tables, chairs, and cabinets, where the joints may come apart over time.
Wobbly Legs: Tables and chairs can become unstable if the legs are loose or damaged.
Cracks in the Wood: Wooden furniture may develop cracks due to changes in temperature and humidity.
Repair Tools Needed
Wood Glue: A strong adhesive specifically designed for woodworking can help reinforce loose joints.
Clamps: Use clamps to hold parts together while the adhesive dries, ensuring a solid bond.
Wood Filler: For cracks and larger gaps, wood filler can be used to create a smooth surface.
Screwdriver: A screwdriver can help tighten any loose screws in hardware or joints.
Sandpaper: Use sandpaper to smooth any repaired areas before reapplying finishes.
Structural Repair Process
Inspect Joints: Check table and chair joints for looseness. Identify areas where wood may have separated.
Apply Wood Glue: For loose joints, apply wood glue into the joint and clamp it until dry. Wipe away any excess glue immediately.
Tighten Hardware: Use a screwdriver to tighten any screws or bolts that may be loose, ensuring stable construction.
Fill Cracks: For cracks, apply wood filler according to package instructions, and allow it to dry completely before sanding smooth.
Refinish Repaired Areas: Once structural repairs are complete, remember to sand and refinish those areas to blend in with the rest of the surface.
Conclusion
Reviving worn-out wooden furniture is a rewarding process that can restore beauty and utility to cherished pieces in your home. Through cleaning, repairs, refinishing, protection, and addressing structural issues, you can ensure that your wooden furniture is not only visually appealing but also functional and long-lasting.
By following these five tips, you can easily revitalize your furniture and keep it looking great for years to come. Whether your furniture has sentimental value or is simply a favorite piece, investing time and effort into its care is worthwhile. With a bit of dedication, you can enjoy the beauty and warmth of wooden furniture in your home, making it a more inviting place to live.

